Folding Diagrams for the Traditional Shuriken
(Two-Piece Throwing Star -- All 22 Steps)

Finished Model
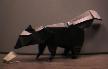
A traditional model, as diagrammed by Jasper.

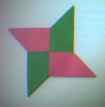
The two-piece shuriken (throwing star) 
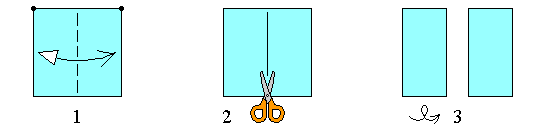
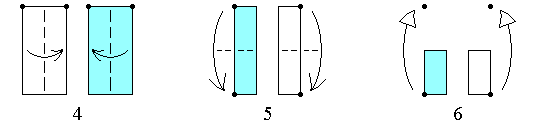
is a simple model that takes 2-5 minutes to make.
Two 3" x 6" (8 cm x 16 cm) rectangles make a 3 1/2 " x 3 1/2 " (9 cm x 9 cm) flat model.

The instructions are quite detailed. If they give you any difficulty, please let me know.

Diagrams for steps 1-3.
  1. Start with a square (4x4).
    Valley fold in half, and unfold.
  2. Cut the square in half, to get two 2x4 sheets. (Evil!)
  3. Optionally, turn over one sheet.
Diagrams for steps 4-6.
  1. Valley fold each half lengthwise, to get two 1x4 sheets.
  2. Valley fold each half the other way, to get two 1x2 rectangles.
  3. Unfold to step 4, to return to two 1x4 sheets.
Diagrams for steps 7-10.
  1. On one sheet, valley fold the bottom half to the right,
    creating a 45 degree crease that ends at the intersection
    of the crease and the edge of the paper.
  2. Valley fold the top half to the left,
    creating a 45 degree crease that ends at the intersection
    of the crease and the edge of the paper.
    The paper should now be in an "S" shape.
  3. Repeat steps 7-8 on the other sheet,
    BUT IN MIRROR IMAGE:
    valley fold the bottom to the left, and the top to the right.
Diagrams for steps 10-12.
  1. Turn both sheets over.
  2. Valley fold the outermost squares in half along 45 degree angles.
    Yes, there are two diagonals to choose from.
    Pick the diagonals that bring corners closer to the
    centers of the sheets. This will make the sheets
    look even more like mirror image "S"es.
  3. Fold the two triangles created in step 10
    across the centers of the sheets.
Diagrams for steps 13-16.
  1. You should now have two mirror image parallelograms,
    each with proportions of 1 x 1.414...
    Turn one parallelogram over, so that the halves are not mirror images anymore.
    One half will have a slit in the middle,
    and the other half will have two flaps showing.
  2. On one piece of paper, open out the flaps, so they stand up.
    On the other piece of paper, open out the flaps, so they point down.
  3. (3-D View.) Rotate one sheet 90 degrees.
  4. Place one half on top of the other,
    so that the slits face outward.
Diagrams for steps 17-22.
  1. Make sure that:
    • Two flaps point up, and two flaps point down.
    • Both slits face outward.
    • The flaps are rotated so that the crossed parallelograms
      are the shape of the finished star.
    Tuck the tip of one upward-pointing flap
    into one half of the upward-facing slit.
  2. Tuck the tip of the other upward-pointing flap into the other half of the upward-facing slit.
  3. Turn the model over.
  4. Tuck another flap into the upward-facing slit.
  5. Tuck the last flap into the slit.
  6. The finished 2-piece shuriken (throwing star)
    is thick, sturdy, and modest in size, with good aerodynamics.
    For purists (like myself), I have designed a one-piece shuriken.
    The complete folding diagrams are available here at FOLDS.NET .

Navigational Assistance:

Home Menagerie More Diagrams Send E-mail Finished Model

[ Home page | Origami Menagerie | Instructions | Comments | Finished Model ]

The finished 2-piece throwing star is in Jasper's Origami Menagerie.
A traditional model. Diagrammed by Jasper in 1996-1999
Copyright 1995-99, 2001 by Jasper (aka John Paulsen). Your comments are welcomed.
Last updated March 24, 2001.