Folding Diagrams for Marie's Rose (49 Steps)

Marie's Rose is a high intermediate model that takes 30-60 minutes to make. It is a 5-sided variation by Marie Tessier on Toshikazu Kawasaki's 4-sided "Rose".
Start with a pentagon, green side up. A pentagon 5 ½ " (14 cm) on a side makes a model 2 ½ " (6 cm) across x 1 ½ " (4 cm) tall.

Diagrams for steps 1-4.
  1. Start with a pentagon, green side up.
    Fold a 5-sided analog of a waterbomb base.
  2. Green side out. Fold the long edges to the centerline.
    Repeat behind.
  3. Unfold completely, and turn over.
  4. White side up. Valley fold through the center of the model.
Diagrams for steps 5-8.
  1. Note that the creases line up. Valley fold.
  2. Unfold completely.
  3. White side up. Pleat.
    (Steps 6 and 7 can be combined into a single step.)
  4. Unfold completely.
Diagrams for steps 9-12.
  1. White side up. Make a short crease halfway between the center and the crease made in Step 6.
    Unfold.
  2. Rotate 72°.
  3. Repeat Steps 4-10 on the other 4 sides.
  4. Turn over.
Diagrams for steps 13-16.
  1. Green side up. Fold parallel to the centerline,
    through a corner of the center pentagon.
  2. Note that the creases line up. Unfold completely.
  3. Green side up. Valley fold from point-to-point. Unfold.
    This step is confusing -- make sure you choose the correct points.
    At the edge of the paper, there are three parallel lines.
    You want the end of the middle parallel line --
    NOT the midpoint of the edge.
    The other point is where a different parallel line
    crosses the crease made in Steps 13-14.
  4. Green side up. Valley fold from point-to-point.
    This step is also confusing -- make sure you choose the correct points.
    At the edge of the paper, there are three parallel lines.
    You want the end of the middle parallel line --
    NOT the midpoint of the edge.
    The other point is the same as in Step 15.
Diagrams for steps 17-20.
  1. Rotate 72°.
  2. Repeat Steps 13-17 on the other 4 sides.
  3. Turn over.
  4. White side up. Twist fold. (Steps 20-27 show how.)
    Lift up one side of the center pentagon.
Diagrams for steps 21-24.
  1. (Diagrams 21-26 are all 3-D views.) Crimp the corner.
    (Use the already-existing mountain and valley folds to overlap the paper.)
  2. Rotate 72°.
  3. Repeat Steps 20-22 on the other 4 sides.
  4. The model looks like a morning glory, in 3-D.
    Turn over.
Diagrams for steps 25-28.
  1. Green side up. Flatten the ridges.
    (The center will twist around.)
  2. Puff out the pentagon, by poking it from the other side,
    or by tugging the corners apart. Flatten the pentagon.
    (In other words, spread-squash the pentagon.)
  3. (The model is flat again.) Turn over.
  4. White side up. Open out an overlapping layer.
Diagrams for steps 29-32.
  1. (Diagrams 29-49 are all 3-D views.)
    Mountain fold on 2 of the creases made in Steps 13-19.
    This step is confusing -- the paper will make a "popping" sound,
    because sharpening one of the creases undoes part of the zig-zag "crimp".
  2. Sharpen the valley fold.
    Underneath, let the crease curve into the center of the model.
    Rotate 72°.
  3. Repeat Steps 28-30 on the other 4 sides.
  4. (Top view.) Like so.
Diagrams for steps 33-34.
  1. (Magnified side view.) Valley fold one flap,
    so that a top point touches the edge. Unfold.
  2. Like so. Repeat Step 33 on the other 4 sides.
Diagrams for steps 35-37.
  1. Let the flaps loosen.
  2. Valley fold the top edge in half.
  3. Unfold to Step 36.
Diagrams for steps 38-40.
  1. Valley fold and unfold.
  2. Squash fold.
  3. Repeat Steps 36-39 on the other 4 sides.
    The squash folds will overlap.
Diagrams for steps 41-44.
  1. Pull 1 green flap out of the way.
  2. You can now see an entire green flap. Fold this flap in half.
    The crease extends in to the tip of the petal.
  3. Tuck the flap inside to lock it.
  4. Repeat Steps 42-43 on the other 4 flaps.
Diagrams for steps 45-48.
  1. (Still a side view.) Like so. Turn over.
  2. (Bottom view.) Green side up.
    Optionally, insert a stem.
    Optionally, bring the green flaps to the center.
  3. Turn over.
  4. (Top view.) White side up.
    Finish to taste, by rolling over and smoothing the edges and petals.
The finished rose.
  1. The finished rose.

Credits

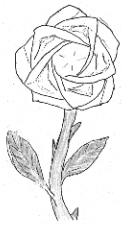
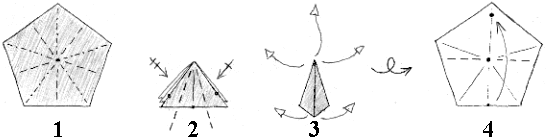
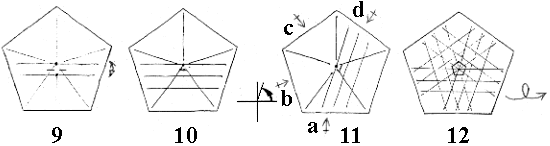
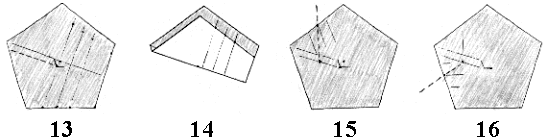
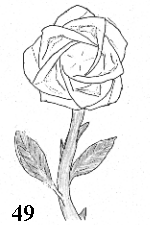
"Marie's Rose" was designed by Marie Tessier. 
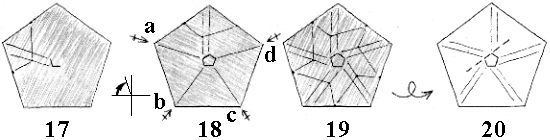
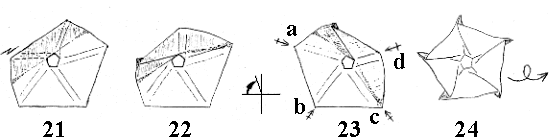
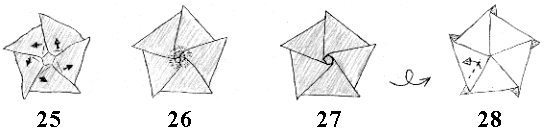
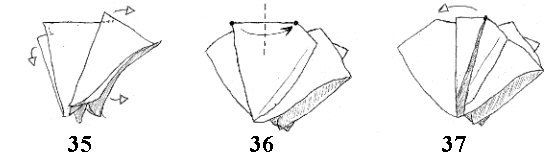
It is a 5-sided variation on Toshikazu Kawasaki's 4-sided "Rose".

To Jasper's knowledge (as of August 2000), "Marie's Rose" is the second true rose (with full 5-fold symmetry). The first was the "White Rose", by Elsa Chen and Jasper.

Kawasaki's "Rose" is diagrammed on pages 128-130 of Origami for the Connoisseur, by Kasahara and Takahama. Chen's original (4-sided) "Rose Bowl" was created in 1997, and diagrammed in the June 1999 issue of the West Coast Origami Guild (WCOG) Newsletter. The "White Rose" was diagrammed in the October 1999 issue of the WCOG Newsletter.


Navigational Assistance:


[ Home page | Origami Menagerie | Instructions | Comments ]

"Marie's Rose" is a 5-sided variation by Marie Tessier on Toshikazu Kawasaki's 4-sided "Rose".
Diagrams copyright 1999, 2000, 2002 by Jasper (aka John Paulsen). Your comments are welcomed.
Last updated August 10, 2002.