Folding Diagrams for
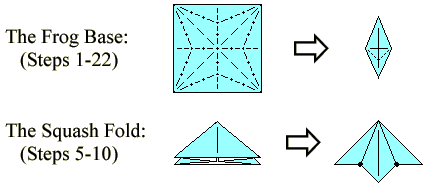
The Squash Fold and Frog Base

Summary

A traditional base, as diagrammed by Jasper.
The frog base is a low-intermediate fold that takes 5-10 minutes to make.
This base is used in the iris, frog, and many other models.
A six inch (15 cm) square makes a 4 1/4 " x 7/8 " (11 cm x 2 1/2 cm) base with four flaps
The instructions are quite detailed. If they give you any difficulty, please let me know.


An Outline of the Diagrams:


The Diagrams:

Diagrams for steps 1-4.
  1. If you want the colored side out
    start with a square, colored side up.
    Fold a waterbomb base,
    colored side out...
  2. ...waterbomb base in progress. Close it up neatly.
  3. Valley fold the tip of one flap to the top of the model.
    The crease should run to the midpoint of the lower edge.
  4. Unfold to Step 3.
    (Note: Steps 3 and 4 are precreases for the petal fold.)
Diagrams for steps 5-8.
  1. Valley fold the long edge of the flap to the centerline.
  2. Unfold to Step 5.
  3. Begin the squash fold.
    The flap has two layers.
    Using a finger or chopstick,
    separate the two layers...
  4. (Exaggerated 3-D view.)
    ...fold the near layer along the centerline.
    Leave the hidden layer in place.
    The tip will come up and over...
Diagrams for steps 9-12.
  1. ...neatly flatten the layers...
  2. Like so.
    Steps 5-9 are called a squash fold,
    because of the "squashing" motion to flatten the layers.

    Book fold.
    A book fold is a kind of valley fold: Valley fold one-half of the flap,
    just like turning a page of a book.
  3. Bisect the tip, as shown.
  4. Unfold to Step 11.
Diagrams for steps 13-15.
  1. Unfold to Step 10.
  2. Repeat Steps 10-12 on the left.
  3. Note that a white tip is showing. Repeat Steps 10-14 on the other three flaps.
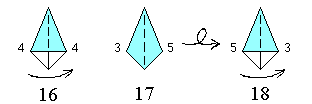
Diagrams for steps 16-18.
  1. Note that the white tips are showing
    and that there are 4 layers on each side.
    Book fold one layer to the right.
  2. Like so. Turn over from side-to-side.
  3. Note that two white tips are showing,
    and that there are 5 layers on the left side,
    and 3 layers on the right side.
    Book fold one layer to the right.
Diagrams for steps 19-22.
  1. Note that NO white tips are showing,
    and that there are 4 layers on each side.
    Petal fold.
  2. Fold the tip back down.
  3. Repeat Steps 19-20 on the other three sides.
    Book fold as necessary.
  4. The finished frog base.
    The frog base is used in the traditional frog and 4-petalled flower.

Navigational Assistance:


[ Home page | Origami Menagerie | Instructions | Comments ]

A traditional base. Diagrammed by Jasper in 1999.
Copyright 1995-99 by Jasper (aka John Paulsen). Your comments are welcomed.
Last updated July 23, 1999.