Folding Diagrams for Eeyore (All 90 Steps)

Finished Model
Designed by Y. Greenberg; Diagrams by Jasper.
Inspired by A.A. Milne and E.H. Shepard.

Eeyore is a complex model that takes 30-60 minutes to make.
A ten inch (25 cm) square makes a 4 1/2 " x 2" (12 cm x 5 cm) flat model.

The instructions are quite detailed. If they give you any difficulty, please let me know.

Diagrams for steps 1-3.
  1. Start with a square, colored side up.
    Fold a preliminary fold, colored side out.
  2. Fold the raw edges in to the centerline, and unfold. Repeat behind.
  3. Fold the top down, and unfold.
Diagrams for steps 4-7.
  1. Petal fold the front.
  2. Fold the tip back down.
  3. Repeat Steps 4-5 behind.
  4. Fold the near tip to the right-hand corner,
    and mark the center. DO NOT crease.
Diagrams for steps 8-11.
  1. Unfold to Step 7.
  2. Repeat Steps 7-8 on the left.
  3. Fold the tip up. The crease runs
    through the intersection of the two marks.
  4. Fold both sides in, so the creases
    made in Step 10 lie on the centerline.
    The new crease will run to the side corners.
Diagrams for steps 12-14.
  1. Unfold to Step 10.
  2. Repeat Steps 7-12 behind.
  3. Lift the near layer up, and pull the sides out.
Diagrams for steps 15-16.
  1. (3-D View.) Pop the center up
    and pull the tips out as far as possible.
  2. Lift the top and bottom points
    to make a pyramid, colored side out.
Diagrams for steps 17-19.
  1. Rabbit ear both points on the creases made in Step 11.
    Rotate 90 degrees.
  2. Fold both tips flat on the creases made in Step 10.
  3. The completed stretched bird base.
    Turn over, from side-to-side.
Diagrams for steps 20-24.
  1. Valley fold the two ends together, but DO NOT fold the hidden points.
  2. Valley fold and unfold the stubby flaps.
  3. Inside reverse fold the stubby flaps.
  4. Valley fold as far down as possible.
    The crease runs through the corners of the hidden flaps.
  5. Valley fold the extra triangles on the bottom half.
Diagrams for steps 25-29.
  1. Unfold to step 24.
  2. Inside reverse fold.
  3. Valley fold up as far as possible.
    The crease runs through the corners of the hidden gussets.
    The crease IS NOT halfway between the existing creases.
  4. Fold the near large triangle down.
  5. Note that a small roof-shape is visible,
    because Step 27 was not halfway between creases.
    Fold the tip back up, along the hidden crease made in Step 27.
Diagrams for steps 30-33.
  1. Fold the tip down along the hidden crease made in Step 28,
    so the new tip is slightly beyond the old tip.
  2. Turn over from side-to-side.
  3. Valley fold the tip down on the existing crease.
  4. Like so.
Diagrams for steps 34-38.
  1. (Magnified view.)
    There is an extra flap on the tip.
    Fold this flap into the pocket.
  2. Fold the near layer of the tip in half.
  3. Fold the rear layer of the tip into the hidden pocket,
    to match the crease made in Step 35.
  4. (Reduced view.) Repeat Steps 34-36 on the left.
  5. Turn over from side-to-side.
Diagrams for steps 39-43.
  1. Valley fold through all layers,
    so that the top edge lines up with the 45 degree crease.
    Only resolve half the crease.
  2. (3-D View.) Unfold.
  3. Repeat Steps 39-40 on the left.
  4. Turn over from side-to-side.
  5. Valley fold the near layer upwards
    at the intersection of the new creases.
Diagrams for steps 44-47.
  1. Turn over from side-to-side.
  2. Note that the creases line up.
    Turn over from side-to-side.
  3. Unfold to Step 43.
  4. Valley fold through all layers on the new crease. Unfold.
Diagrams for steps 48-51.
  1. Crimp the model to form the angle bisector.
    The left side will pull up.
  2. (3-D View.) Like so.
    Unfold to Step 48.
  3. Repeat Steps 48-49 on the left.
  4. Unfold the near triangle.
    Turn over from side-to-side.
Diagrams for steps 52-56.
  1. Valley fold the top down.
  2. Valley fold the sides to the creases made in Step 39. The new creases line up with the hidden edges. Unfold.
  3. Valley fold the near layer horizontally at the top of the hidden roof.
  4. Swivel-fold the tail.
  5. Book fold the model in half.
    Rotate 90 degrees.
Diagrams for steps 57-59.
  1. Fold the near right tip as far
    to the left as possible. Repeat behind.
  2. Fold the tip of the head down
    to the front of the ankle. Unfold.
  3. (Magnified View.)
    Fold the bottom edge of the head to the top right corner of the shoulder.
    The new crease intersects the crease made in Step 58 at the edge of the paper.
Diagrams for steps 60-63.
  1. Like so. Unfold to Step 59.
  2. Fold the tip to the bottom end of the crease made in Step 58.
  3. Mountain fold the doubled tip underneath.
  4. Unfold to Step 61.
Diagrams for steps 64-67.
  1. Crimp on the creases made in Steps 58-60.
  2. Adjust the crimp so that the front edge lies along the hidden edge.
  3. Like so. Outside reverse fold the chin.
  4. Pull out loose paper. Repeat behind.
Diagrams for steps 68-70.
  1. Like so. Mountain fold or closed sink to lock and round the skull.
  2. Valley fold and unfold the nose.
  3. Inside reverse fold the nose to lock the head.
Diagrams for steps 71-72.
  1. Fold the ear flap to the right.
    Repeat behind.
  2. Radial pleat the ear flap to make a shoulder.
    Repeat behind.
Diagrams for steps 73-76.
  1. The hidden part of the skull has a hidden flap on each side (the jowls).
    Valley fold the ear flap along the free part of the jowl.
    Repeat behind.
  2. Valley fold, so that the raw edge of the ear lies along the crease
    made in Step 73. Repeat behind.
  3. Unfold to Step 73. Repeat behind.
  4. Squash fold the ear on existing creases.
    Repeat behind.
Diagrams for steps 77-79.
  1. Mountain fold the tip of the ear inside.
    Repeat behind.
  2. Mountain fold the ear in half.
    Repeat behind.
  3. (The head and ears are still three separate flaps.
    Wait until Step 89 before locking them together.)
    Crimp the left of the model (on existing creases)
    to shape the hind legs. Repeat behind.
Diagrams for steps 80-82.
  1. Inside reverse fold the butt and tail.
  2. Inside reverse fold the hind foot.
    Repeat behind.
  3. Adjust creases to cover the heel.
    Repeat behind.
Diagrams for steps 83-85.
  1. Mountain fold the belly inside.
    Swivel fold to make a gusset inside the hip.
    Repeat behind.
  2. Inside reverse fold the tail to the left.
  3. Outside reverse fold the bow material.
Diagrams for steps 86-88.
  1. Outside reverse fold the bow to the right.
  2. Pleat the bow.
  3. Outside reverse fold the tip of the tail down.
Diagrams for steps 89-90.
  1. The hidden part of the skull has a hidden flap on each side (the jowls).
    Tuck a jowl into the inside pocket of an ear.
    Repeat behind.

    Stand Eeyore up.
    Adjust the head, feet, and ears.
     
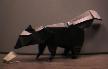
  2. (Magnified view of the finished model.)

    Some variations:
    1. Pinch the tail to narrow it (as shown).
    2. Fluff the model out, by spreading the tops of the hind leg creases,
      and bending the feet inward (as shown).
    3. Shape the eyes and mouth (as shown).
    4. Color change the bow at Steps 84-88 (as shown).
    5. Color change the tip of the tail to match the body,
      (as shown) after color changing the bow.
    6. Open sink the ears at Steps 77-78.
    7. Point the ears up by double inside reverse folding them
      instead of Steps 73-78. (Variations F and G go well together.)
    8. Narrow the neck by inside reverse folding
      the lowest edge at step 68. Repeat behind.
    9. At Step 58, make a dragon or Kerberos (three-headed dog) a la Montroll.

Navigational Assistance:


[ Home page | Origami Menagerie | Instructions | Comments ]

Designed by Y. Greenberg in 1996. Diagrammed by Jasper in 1996, 98-99.
Copyright 1995-99 by Jasper (aka John Paulsen). Your comments are welcomed.
Last updated July 23, 1999.