How to Tie a Bow-Tie
These steps are illustrated on
page1.gif
and page2.gif.
Pages 1 and 2 are meant to be printed on 8 ½" x 11"
paper at 96 dpi with ¾" inch margins.
-
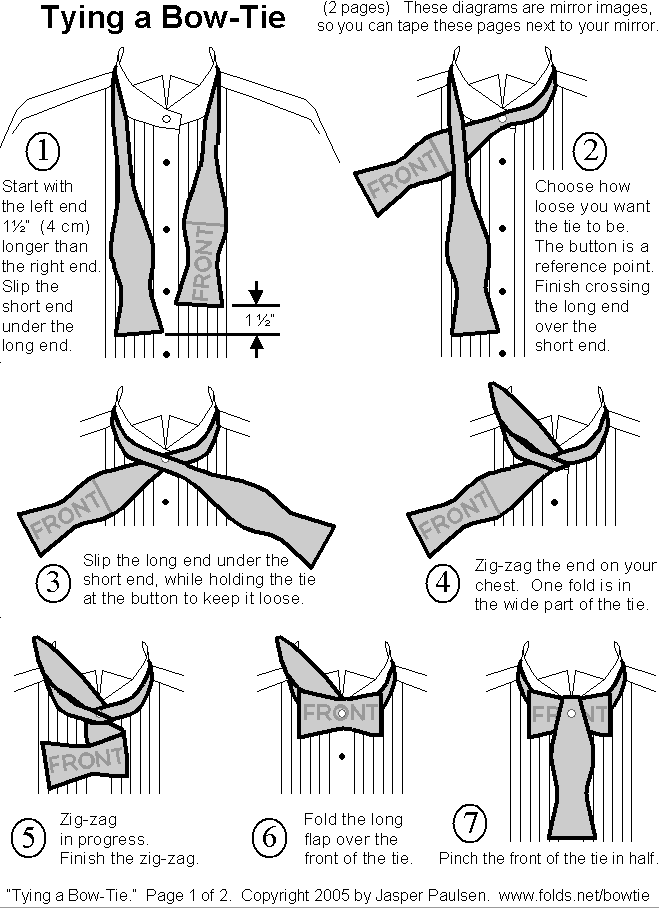
Start with the left end 1 ½" (4 cm)
longer than the right end.
Slip the short end under the long end.
Hint: The extra length (such as 1 ½")
depends on the width of the narrow part of the tie,
the thickness of the cloth, and whether you want
a symmetrical tie. Some people prefer
lopsided or tilted ties.
-
Choose how long you want the tie to be.
The button is a reference point.
Finish crossing the long end over the short end.
-
Slip the long end under the short end,
while holding the tie at the button
to keep it loose.
-
Zig-zag the end on your chest.
One fold is in the wide part of the tie.
-
Zig-zag in progress.
-
Fold the long flap over the front of the tie.
-
Pinch the front of the tie in half.
This will let you find a side-to-side hole
through the tie, which is hidden
behind the front of the tie.
-
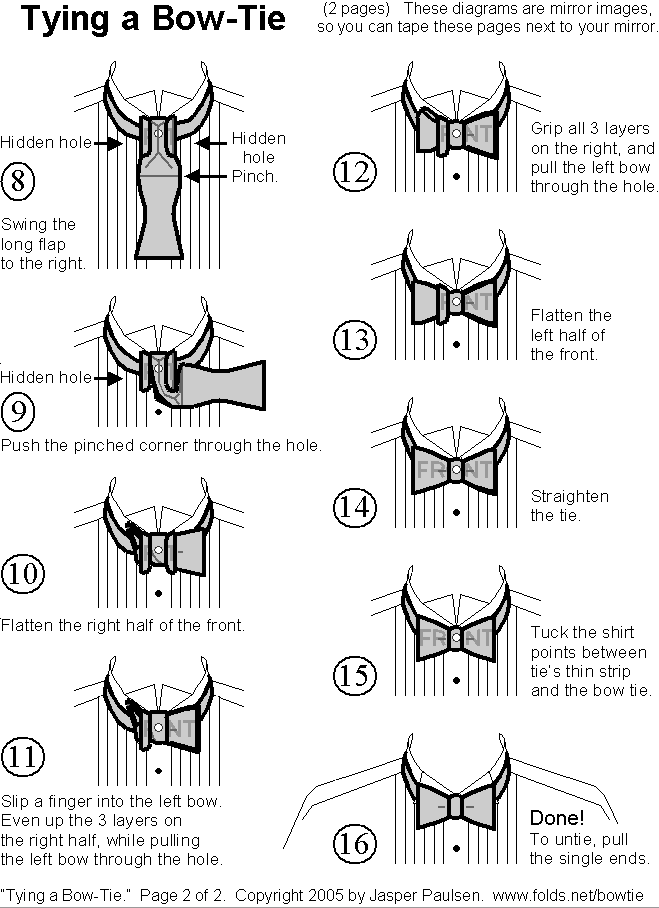
Pinch the right side of the wide part of the tie,
while swinging the long flap to the right.
-
Push the pinched corner through the hidden hole.
-
Flatten the right half of the front.
-
Slip a finger into the left bow.
Even up the 3 layers of the right half,
while pulling the left bow through the hole.
-
Grip all 3 layers on the right,
and pull the left bow through the hole.
-
Flatten the left half of the front.
-
Straighten the tie.
Hint: Some people prefer
lopsided or tilted ties.
-
Tuck the shirt points between the tie's
thin strip and the bow tie.
-
Done!
To untie, pull the single ends.
Acknowledgements
Related Links
Navigational Assistance
A traditional knot. Diagrammed by
Jasper in 2005.
Copyright 2005-2006 by
Jasper Paulsen.
Your comments are welcomed.
[ Home page
| Origami Menagerie
| Instructions
| Comments
]
Last updated August 13, 2006.