Folding Diagrams for the
Petal Fold (Last 8 Steps)
A traditional fold, as diagrammed by Jasper.
The petal fold is a low intermediate fold that takes 1-2 minutes to make.
This base is used in the crane, frog, and many other models.
There are two ways to make the petal fold.
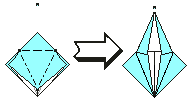
 This page shows how to make
the petal fold in the bird base and crane.
This page shows how to make
the petal fold in the bird base and crane.
These instructions assume that the model
is completely pre-creased,
as shown in the
bird base diagrams.
You will be folding a square flap into a pointy "petal".
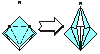
 Another page shows how to make
the petal fold in the frog base and frog.
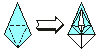
Another page shows how to make
the petal fold in the frog base and frog.
That page takes a pointy flap
and makes a pointy "petal".
The instructions are quite detailed.
If they give you any difficulty, please
let me know.
An Outline of the Diagrams:
The Diagrams:
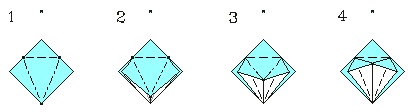
- Hold down the upper triangle, and lift up the lower tip.
The valley fold will flex...
- ...push up underneath the central triangle...
- ...the tip will lift further; the side triangles will lag...
- ...the 'roots' of the flap are now exposed.
Continue to push the tip forward, while holding down the upper triangle
and the two triangles at the root of the flap...
|
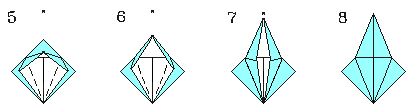
- ...the 'roots' of the flap are now exposed.
Continue to push the tip forward, while holding down the upper triangle
and the two triangles at the root of the flap...
- ...as the flap approaches the top of the model,
the side triangles will approach the centerline.
Release the roots...
- Press the model flat.
- The finished petal fold.
|